고정 헤더 영역
상세 컨텐츠
본문
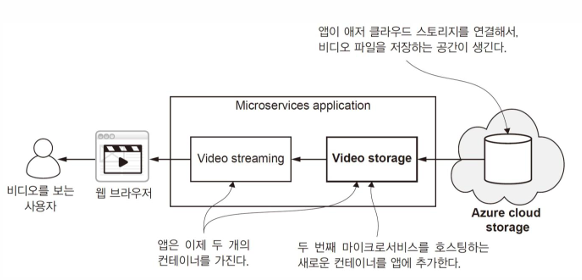
🎬 FlixTube v0.2 (파일 저장소 추가)
파일 저장소 추가
🟠 FlixTube v0.1과 차이
✔ FlixTube v0.1
video-streaming 이라는 하나의 마이크로서비스에서 서비스 수행
하나의 도커 이미지 안에 하나의 마이크로서비스, 동영상 파일이 같이 들어있음
(테스트 비디오를 파일시스템에서 읽어옴)
✔ FlixTube v0.2
video-streaming 마이크로서비스 + gcp-stoage (video-storage) 마이크로서비스

테스트 비디오를 가져오는 부분을 gcp-storage (video-storage) 마이크로서비스에 위임함으로써, 책임분리
🟡 실습1. 파일 저장소 추가
video-streaming: 사용자에게 비디오를 스트리밍하는 것만 책임
gcp-storage : 비디오 파일 저장소로부터 테스트 비디오 가져오기 (클라우드 저장소 활용)
(실습1 에서는 비디오 파일의 경로 하드 코딩)
🟡 실습2. 데이터베이스 추가
video-streaming: 사용자에게 비디오를 스트리밍하는 것만 책임
video-storage: 비디오 파일 저장소로부터 테스트 비디오 가져오기 (클라우드 저장소 활용)
database : 비디오의 메타데이터 저장
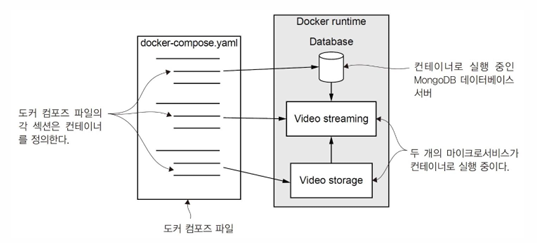
🟠 docker-compose 소개
필요성
개발 환경에서 여러 컨테이너의 쉬운 관리를 위해
(쿠버네티스는 클러스터에서 실행하도록 설계된 크고 복잡한 도구)
(쿠버네티스는 굉장히 많은 서버 위에서 돌아가는 클러스터 위에서 돌아가도록 설계되어있으므로,개인이 클러스터의 환경을 갖추긴 쉽지 않음-> 클러스터 환경이 없더라도, ms 같이 여러 컨테이너를 띄워서 개발, 테스트 할 수 있는 환경을 만들기 위해서 docker-compose 활용)
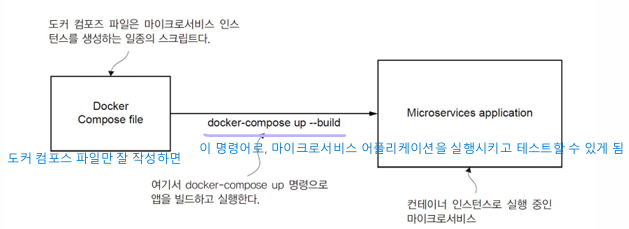
docker-compose.yaml 파일 작성
docker compose의 활용
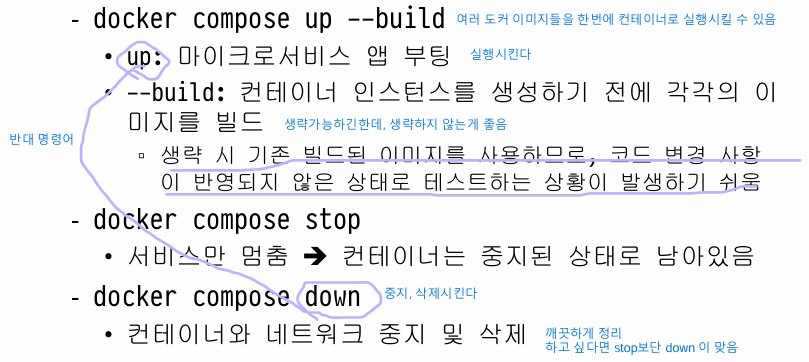
docker compose up --build
docker compose stop
docker compose down
이제 docker compose 활용해서 실제 앱에 파일 저장소를 추가해보자
🟡 실습1. 파일 저장소 추가
0️⃣ 클라우드 저장소 만들기
앱이 사용할 비디오를 저장하기 위한 공간 -> 클라우드 저장소 활용
1. 클라우드 저장소 만들기
GCP-Cloud Storage-Buckets-create
2. 생성완료 후, upload files
Cloud Storage - Buckets -> UPLOAD FILES
3. 서비스 계정 설정
IAM & ADMIN -> Service Accounts -> Create service account
(서비스 계정? 생성한 버킷에 애플리케이션이 접속할 수 있게 해줌. 애플리케이션을 위한 별도의 계정)
4. 설정한 서비스 계정에서 키 생성
KEYS -> add key -> Create new key (JSON)
5. VM 인스턴스에 json 파일 저장
: 로컬 pc에 다운 받아 둔 json 파일 -> scp를 사용 -> 원격에 있는 인스턴스에 넣어주기
(scp : SSH를 사용하여 로컬 시스템과 원격 시스템 간에 파일을 복사하는 데 사용됨 )
1️⃣ GCP 스토리지를 읽어오는 마이크로서비스 만들기 (gcp-storage/index.js)
✔ [example-2] gcp-storage/index.js 파일
// index.js

// [1] Express 및 Google Cloud Storage 모듈 가져오기
const express = require("express");
const { Storage } = require('@google-cloud/storage');

const app = express();


// [2] 환경 변수 추출 및 오류 처리
// Extracts environment variables to globals for convenience.
//

const PORT = process.env.PORT;
const GCP_PROJECT_ID = process.env.GCP_PROJECT_ID;
const GCP_KEYFILE_PATH = process.env.GCP_KEYFILE_PATH;
const GCP_BUCKET_NAME = process.env.GCP_BUCKET_NAME;

console.log(`Serving videos from GCP Bucket: ${GCP_BUCKET_NAME}.`);

//
// Throws an error if any required environment variables are missing.
//

if (!process.env.PORT) {
    throw new Error("Please specify the port number for the HTTP server with the environment variable PORT.");
}


if (!process.env.GCP_PROJECT_ID) {
    throw new Error("Please specify your Google Cloud Project ID in environment variable GCP_PROJECT_ID.");
}

if (!process.env.GCP_KEYFILE_PATH) {
    throw new Error("Please specify the path to your GCP key file in environment variable GCP_KEYFILE_PATH.");
}

if (!process.env.GCP_BUCKET_NAME) {
    throw new Error("Please specify the name of your GCP storage bucket in environment variable GCP_BUCKET_NAME.");
}

// [*] Google Cloud Storage 서비스 API 클라이언트 생성 함수 정의
// Creates the Storage service API client to communicate with GCP storage.
// GCP 서비스 API 클라이언트를 생성
// 프로젝트 ID와 인증 키 파일 경로를 사용하여 스토리지 객체를 생성
function createStorageClient() {
    const storage = new Storage({
        projectId: GCP_PROJECT_ID,
        keyFilename: GCP_KEYFILE_PATH,	// <- 로컬에서 다운받고 scp 해준 json 파일
    });
    return storage;	// 스토리지 객체 생성
}

// [3] HTTP GET 라우트 등록
// Registers a HTTP GET route to retrieve videos from storage.
// /video 엔드포인트에 대한 GET 요청 핸들러 등록
// : 클라이언트로부터의 요청을 받아서 Google Cloud Storage에서 해당 비디오를 스트리밍
app.get("/video", (req, res) => {

    const videoPath = req.query.path;
    console.log(`Streaming video from path ${videoPath}.`);

    const storage = createStorageClient();
    const bucket = storage.bucket(GCP_BUCKET_NAME);

	// 비디오 파일의 메타데이터를 사용하여 HTTP 응답 헤더를 설정하고, 비디오 파일을 클라이언트에게 스트리밍
    bucket.file(videoPath).getMetadata((err, metadata) => {
        if (err) {
            console.error(`Error occurred getting properties for video ${GCP_BUCKET_NAME}/${videoPath}.`);
            console.error(err && err.stack || err);
            res.sendStatus(500);
            return;
        }

        //
        // Writes HTTP headers to the response.
        //
        res.writeHead(200, {
            "Content-Length": metadata.size,
            "Content-Type": "video/mp4",
        });

        //
        // Streams the video from GCP storage to the response.
        //
        bucket.file(videoPath).createReadStream().on('error', err => {
            console.error(`Error occurred getting video ${GCP_BUCKET_NAME}/${videoPath} to stream.`);
            console.error(err && err.stack || err);
            res.sendStatus(500);
        }).pipe(res);
    });
});

app.listen(PORT, () => {
    console.log(`Microservice online`);
});
2️⃣ 비디오 스트리밍 마이크로서비스 업데이트 (video-streaming/index.js)
테스트 비디오를 가져오는 부분을 gcp-storage 마이크로서비스에 위임함으로써, 책임 분리
-> video-streaming: 사용자에게 비디오를 스트리밍하는 것만 책임
-> gcp-storage : 비디오 파일 저장소에서 테스트 비디오를 가져오기
✔ [example-2] video-streaming/index.js 파일
비디오 파일의 경로는 현재 하드 코딩되어 있음. 실습2 에서 db 활용하는걸로 업데이트
const express = require("express");
const http = require("http");

const app = express();

// [1] 환경 변수 확인 및 추출
// Throws an error if the any required environment variables are missing.
//

if (!process.env.PORT) {
    throw new Error("Please specify the port number for the HTTP server with the environment variable PORT.");
}

if (!process.env.VIDEO_STORAGE_HOST) {
    throw new Error("Please specify the host name for the video storage microservice in variable VIDEO_STORAGE_HOST.");
}

if (!process.env.VIDEO_STORAGE_PORT) {
    throw new Error("Please specify the port number for the video storage microservice in variable VIDEO_STORAGE_PORT.");
}

//
// Extracts environment variables to globals for convenience.
//
const PORT = process.env.PORT;
const VIDEO_STORAGE_HOST = process.env.VIDEO_STORAGE_HOST;
const VIDEO_STORAGE_PORT = parseInt(process.env.VIDEO_STORAGE_PORT);
console.log(`Forwarding video requests to ${VIDEO_STORAGE_HOST}:${VIDEO_STORAGE_PORT}.`);

// [2] HTTP GET 요청 핸들러 등록
// Registers a HTTP GET route for video streaming.
// 클라이언트로부터의 요청을 받아서 비디오 스토리지 마이크로서비스로 해당 요청을 포워딩
app.get("/video", (req, res) => {
    const forwardRequest = http.request( // Forward the request to the video storage microservice.
        {
            host: VIDEO_STORAGE_HOST,
            port: VIDEO_STORAGE_PORT,
            path: '/video?path=SampleVideo_1280x720_1mb.mp4', // Video path is hard-coded for the moment. 뒤쪽 파트에서, db 활용하는걸로 바꿀 예정
            method: 'GET',
            headers: req.headers
        },
        forwardResponse => {	// 요청이 완료되면, 포워드된 응답을 클라이언트(웹 브라우저)에게 다시 전송
            res.writeHeader(forwardResponse.statusCode, forwardResponse.headers);
            forwardResponse.pipe(res);
        }
    );

    req.pipe(forwardRequest);
});

// [3] HTTP 서버 시작
// Starts the HTTP server.
// 서버는 지정된 포트 번호(PORT 변수)에서 클라이언트 요청을 수신하고 처리
app.listen(PORT, () => {
    console.log(`Microservice online`);
});
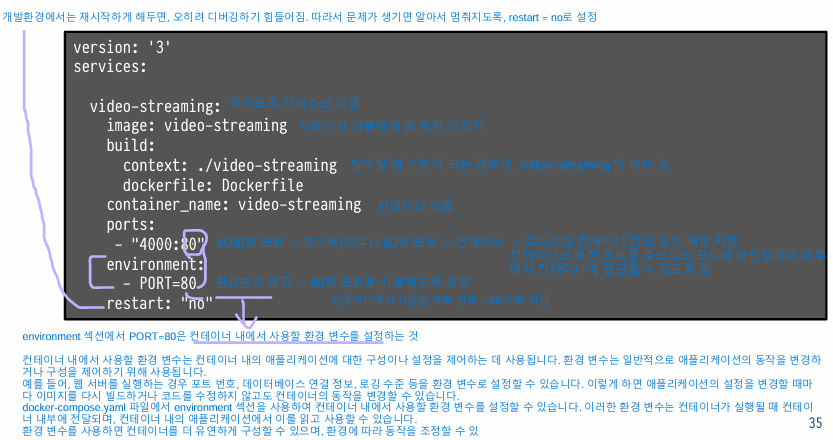
3️⃣ docker-compose.yml
새로운 마이크로서비스를 docker-compose.yml 에 추가함으로써, video-streaming과 gcp-storage 마이크로서비스를 통합
✔ [example-2] docker-compose.yml
version: '3'
services:

  gcp-storage:
    image: gcp-storage	// gcp-storage 이미지로부터 컨테이너 생성
    build:
      context: ./gcp-storage	// 이 경로를 참고해서 생성
      dockerfile: Dockerfile	// ./gcp-storage 안에 Dockerfile 존재
    container_name: video-storage	// [추상화] gcp-storage 이미지로부터 만들 컨테이너 이름 video-storage으로 설정
    ports:
     - "3000:8080"
    environment:
      - PORT=8080
      - GCP_PROJECT_ID=<insert your GCP Project ID here>
      - GCP_KEYFILE_PATH=<insert your GCP key file path here>
      - GCP_BUCKET_NAME=<insert your GCP storage bucket name here>
    restart: "no"

  video-streaming:
    image: video-streaming
    build:
      context: ./video-streaming
      dockerfile: Dockerfile
    container_name: video-streaming
    ports:
     - "3001:8080"
    environment:
      - PORT=8080
      - VIDEO_STORAGE_HOST=video-storage	// 컨테이너 이름 (컨테이름을 통해 다른 컨테이너에 접근할 수 있도록 셋팅)
      - VIDEO_STORAGE_PORT=8080
    restart: "no"
컨테이너의 이름을 통해, 마이크로 서비스 간 통신 가능
컨테이너의 이름은 video-storage / video-streaming 으로 설정
🧐컨테이너 이름을 gcp-storage가 아닌 video-storage로 설정한 이유?
현재는 gcp 스토리지를 썼지만, aws 또는 azure 스토리지를 쓸 수 도 있음
-> video-storage 라는 이름으로 추상화해서 표현
-> video-streaming 마이크로서비스에 영향을 주지 않고 대체 가능
docker compose up --build
업데이트한 앱 테스트
테스트 URL 접속
http://:3001/video
http://:3000/video?path=SampleVideo_1280x720_1mb.mp4
원격에 있는 GCP Buckets으로부터 해당 파일을 읽어서 스트리밍됨
🟠 http://<VM IP주소>:3001/video 요청 처리 로직
video-streaming 서비스는
Docker 컨테이너 내에서 실행 중이며, 포트 3001에서 수신 대기
받은 요청을 처리하기 위해 내부적으로 Express 애플리케이션 실행 ( HTTP 서버 생성, 요청을 처리할 라우트 설정. 해당 애플리케이션은 "/video" 경로에 대한 GET 요청을 기다리고 있음 )
video-storage 서비스는
받은 요청을 처리하기 위해 내부적으로 Express 애플리케이션을 실행 ( 해당 애플리케이션은 "/video" 경로에 대한 GET 요청을 처리할 수 있는 미들웨어 함수를 가지고 있음 )
- 클라이언트가 http://<VM IP주소>:3001/video 경로로 HTTP GET 요청을 보냄
- 해당 요청은 video-streaming 서비스의 /video 엔드포인트로 전달됨
- video-streaming 서비스 의 Express 애플리케이션은 해당 요청을 처리하기 위해 등록된 미들웨어 함수 app.get("/video", (req, res) => {} 실행
- 이 미들웨어 함수에서는 video-storage 서비스로 요청을 전달하기 위해 http.request()를 사용하여 새로운 HTTP 요청 생성 후 요청 보냄 -> req.pipe(forwardRequest);
- 요청으로부터 path 파라미터 추출하여 해당 비디오의 경로를 결정 ( 여기에서는 비디오 경로 하드코딩 되어있음 )
- VIDEO_STORAGE_HOST와 VIDEO_STORAGE_PORT 에 지정된 호스트와 포트로 요청 전달 ( gcp-storage 서비스에 /video 엔드포인트로 HTTP GET 요청을 보냄 )
- gcp-storage 서비스 의 Express 애플리케이션은 해당 요청을 처리하기 위해 등록된 미들웨어 함수 app.get("/video", (req, res) => {} 실행
- 이 미들웨어 함수에서는 GCP 스토리지에서 비디오 파일을 가져와야 함
- videoPath 설정 (요청의 쿼리 문자열에서 path 매개변수를 추출 -> 클라이언트가 전달한 비디오 파일의 경로를 파싱하여 실제 GCP 버킷 내의 파일 경로를 결정)
- GCP Storage 클라이언트 ( API 클라이언트 ) 생성, bucket 정보 설정
- 결정된 파일 경로를 사용하여 해당 경로에 있는 비디오 파일의 메타데이터(예: 파일 크기, 파일 유형 등)를 요청
- 받은 메타데이터를 가지고 ( 비디오 파일의 크기, MIME 타입 포함한 ) HTTP 응답 헤더 생성
- GCP 스토리지에서 비디오 파일을 스트리밍하여 응답으로 보냄 ( gcp-storage 서비스로 )
- bucket.file(videoPath)를 통해 GCP 버킷에서 해당 비디오 파일을 가져옴
- createReadStream()을 사용하여 파일의 내용을 읽는 스트림 생성 ( = 파일을 조각조각 읽는 것을 의미 )
- pipe(res)로 스트림의 데이터를 video-streaming 서비스 에 HTTP 응답으로 전송
- gcp-storage 서비스에서 반환한 데이터가 video-streaming 서비스 의 forwardResponse.pipe(res); 함수를 통해 클라이언트에게 전달됨
- forwardResponse : gcp-storage 서비스로부터 반환된 HTTP 응답 객체
- pipe(res) 메서드는 이 응답 객체에서 클라이언트로 응답을 전달하기 위해 스트리밍을 시작
- -> gcp-storage 서비스로부터 반환된 응답 스트림을 클라이언트의 응답 스트림으로 전달하여 클라이언트에게 응답이 전송됨
'클라우드 네이티브' 카테고리의 다른 글
| 6️⃣ 쿠버네티스 오브젝트 (0) | 2024.05.13 |
|---|---|
| 5️⃣ 컨테이너 오케스트레이션과 쿠버네티스 (0) | 2024.05.13 |
| 4️⃣ 마이크로서비스 간의 통신 (0) | 2024.05.13 |
| 3️⃣ 마이크로 서비스 데이터 관리 (데이터베이스 추가) (0) | 2024.05.12 |
| 1️⃣ 마이크로서비스 게시 (0) | 2024.05.07 |


